ทำเล่นให้เป็นจริง
Project Monitor Temp
ขอบอกก่อนว่าโพสต์นี้ผมทำเป็นรูปแบบอัพข้อมูลเรื่อยๆ ทีละขั้นตอน อาจใช้เวลานานกว่าจะสมบูรณ์หากไม่ติดปัญหาใดๆ ก็จะอัพข้อมูลให้เรื่อยๆ
Project Monitor Temp จะทำในรูปแบบให้ Esp หนึ่งตัวเป็น Server และอีก 2 ตัวหรือมากว่านั้นเป็น Client สามารถติดต่อกันได้ภายในโดยไม่ต้องใช้ Internet หรือ Router เป็นตัวกลาง
สามารถนำไปประยุกต์ใช้ในระบบโรงเรือน โรงงาน เพื่อต้องการให้อุปกรณ์สื่อสารกันได้ระยะไกลแบบไร้สายนั้นเอง

รูป ไดอะแกรมเบื้องต้น
ขั้นตอนการทำ
ศึกษาและทดสอบ
- Esp8266 server + OLED
|-Mode AP
- Esp8266 Client
|-Mode Static
-รับ ส่ง ข้อมูลรูปแบบ json
*ข้อมูลชนิด json ถือว่าเป็นเรื่องที่จำเป็นต้องศึกษา เพราะในโลกของ web database ส่วนใหญ่ก็จะใช้รูปแบบการสื่อสาร json เข้ามาช่วย แทนการส่งข้อมูลเป็นก้อนๆ ออกไป

ฮาดแวร์ Esp server + Esp client
กำหนดให้จอ OLED แสดงผลตัวแปรที่อ้างอิงก่อนเพื่อใช้ในการทดสอบ และวางกราฟฟิก
-โดยให้แสดงผล IP ของ Esp8266 ไม่ว่าจะเป็นโหมด Static หรือ AP
-ให้แสดงผลของ Client ที่สามารถ Connect ได้ แต่ในการทดสอบก็อ้างอิงตัวแปร float เพื่อใช้ในการแสดงผลก่อน

#include <ESP8266WiFi.h>
#include <WiFiClient.h>
#include <ESP8266WebServer.h>
#include "global.h"
#include "Initial.h"
#include <ESP_SSD1306.h> // Modification of Adafruit_SSD1306 for ESP8266 compatibility
#include <Adafruit_GFX.h> // Needs a little change in original Adafruit library (See README.txt file)
#include <SPI.h> // For SPI comm (needed for not getting compile error)
#include <Wire.h> // For I2C comm, but needed for not getting compile error
#include <TimeLib.h>
ESP_SSD1306 display(OLED_RESET); // FOR I2C
//***Other************************************//
String line;
//***OLED************************************//
// Pin definitions
#define OLED_RESET 16 // Pin 15 -RESET digital signal
// Display demo definitions
#define NUMFLAKES 10
#define XPOS 0
#define YPOS 1
#define DELTAY 2
#define LOGO16_GLCD_HEIGHT 16
#define LOGO16_GLCD_WIDTH 16
//***WiFi************************************//
const char* ssid = "ROMSAI-A1";
const char* password = "rsap1111";
/* Set these to your desired credentials. */
const char *ssidAP = "ESPap";
const char *passwordAP = "esp@thai";
//***************************************//
const char* wifi_ip[4] = {"192", "168", "1", "250"}; // Change your ip local network
const char* wifi_subnet[4] = {"255", "255", "255", "0"}; // Change your subnet local network
const char* wifi_gateway[4] = {"192", "168", "1", "1"}; // Change your gateway local network
void setup()
{
Serial.begin(115200);
WiFi.disconnect(true); // delete old config
SetMode("WIFI_AP_STA"); //WIFI_STA and WIFI_AP_STA
// SSD1306 Init
display.begin(SSD1306_SWITCHCAPVCC); // Switch OLED
display.clearDisplay();
display.setTextSize(2);
display.setTextColor(WHITE);
display.setCursor(0,0);
display.println("Hello");
display.display();
delay(2000);
display.clearDisplay();
}
void loop()
{
dsp_myIP();
}
void dsp_myIP()
{
IPAddress myIPx = WiFi.softAPIP();
display.setTextSize(1);
display.setCursor(0,10);
display.println( myIPx );
display.display();
delay(2000);
display.clearDisplay();
}
void wifiScan(void){Serial.println("scan start");// WiFi.scanNetworks will return the number of networks foundint n = WiFi.scanNetworks();Serial.println("scan done");if (n == 0) {Serial.println("no networks found");} else {Serial.print(n);Serial.println(" networks found");for (int i = 0; i < n; ++i) {// Print SSID and RSSI for each network foundSerial.print(i + 1);Serial.print(": ");Serial.print(WiFi.SSID(i));Serial.print(" (");Serial.print(WiFi.RSSI(i));Serial.print(")");Serial.println((WiFi.encryptionType(i) == ENC_TYPE_NONE)?" ":"*");delay(10);}}// Serial.println("Setup done");Serial.println("==============================");}//****************************************////***************************************//void configWiFiModeSTA(void){WiFi.begin(ssid, password);//WiFi.begin(ssid, password);Serial.println("");/*=== If you not use static ip comment here ===*/WiFi.config(IPAddress(atoi(wifi_ip[0]), atoi(wifi_ip[1]), atoi(wifi_ip[2]), atoi(wifi_ip[3])),IPAddress(atoi(wifi_gateway[0]), atoi(wifi_gateway[1]), atoi(wifi_gateway[2]), atoi(wifi_gateway[3])),IPAddress(atoi(wifi_subnet[0]), atoi(wifi_subnet[1]), atoi(wifi_subnet[2]), atoi(wifi_subnet[3])));/*=== End comment here ===*/// Wait for connectionwhile (WiFi.status() != WL_CONNECTED) {delay(500);Serial.print(".");}Serial.println("");Serial.print("Connected to ");Serial.println(ssid);Serial.print("IP address: ");Serial.println(WiFi.localIP());Serial.println("");delay(1000);}void configModeAP(void){Serial.println("");Serial.println("Configuring access point...");/* You can remove the password parameter if you want the AP to be open. */WiFi.softAP(ssidAP, passwordAP);IPAddress myIP = WiFi.softAPIP();Serial.print("AP IP address: ");Serial.println(myIP);delay(1000);}//****************************************////***ConfigMode***************************//void ConfigMode(String strMode){Serial.print("Setup Mode : ");Serial.println(strMode);if( strMode == "WIFI_AP_STA" ){configModeAP();}if( strMode == "WIFI_STA" ){wifiScan();configWiFiModeSTA();}Serial.println("Esp32 Ready...");Serial.println("==============================");}//***************************************////***************************************////**SET-MODE*****************************//void SetMode(String strWIFI_mode){//Set WiFi to station mode and disconnect from an AP if it was previously connected//WiFi.mode => WIFI_AP_STA OR WIFI_STAif( strWIFI_mode == "WIFI_STA" )WiFi.mode(WIFI_STA);else if( strWIFI_mode == "WIFI_AP_STA" )WiFi.mode(WIFI_AP_STA);WiFi.disconnect();delay(1000);ConfigMode(strWIFI_mode);//// confStage = strWIFI_mode; //confStage to void handleConfig}
//======================================================//
ขอพูดถึงข้อมูลชนิด json จะประกอบด้วย Root และ Data ข้อมูลจะอยู่ภายใต้เครื่องหมาย {} ซึ่งจะคล้าายกับตัวแปล Array เพียงแต่การอ้างอิงตำแหน่งใช้ ข้อมูลอ้างอิงดึงค่าออกมาได้เลย
"{"client_01":{"temperature":"123.45","humidity":"567.89"}}"
//======================================================//
Esp8266 server mode AP + Esp8266 client mode Static
กำหนดให้ Esp8266 server เป็นโหมด AP เพื่อปล่อยสัญญาณ WiFi ให้อุปกรณ์ตัวอื่นมาเกาะ และให้ Esp8266 client เป็นโหมด Static ไปจับสัญญาณ WiFi
ในที่นี้ได้โปรแกรมโหมด AP สามารถกำหนด IP Address ได้เช่นกัน
*SSID และ Pass ต้องตรงกันทั้ง 2 ฝั่ง หาก Client ไปเกาะ WiFi ตัวอื่นหรือ Router ทำให้อุปกรณ์หากันไม่เจอ และ IP address ต้องไม่ชนกันหรือไม่ใช้เบอร์เดียวกัน
Esp8266 client เมื่อมีการ Refresh web page ให้ไปอ่านค่า Temp เพื่อมาแสดงผล ซึ่งข้อมูลเป็นชนิด json และโปรแกรมมีการป้องการไม่ให้ Esp8266 เกิด WDT Error ด้วยการให้อ่านค่า Temp เมื่อเวลาต่างกับ 2 mS เป็นต้นไป หากมีการ Refresh หน้าเว็บซ้ำๆ ถี่ๆ ก็จะได้ข้อมูลเดิมๆ
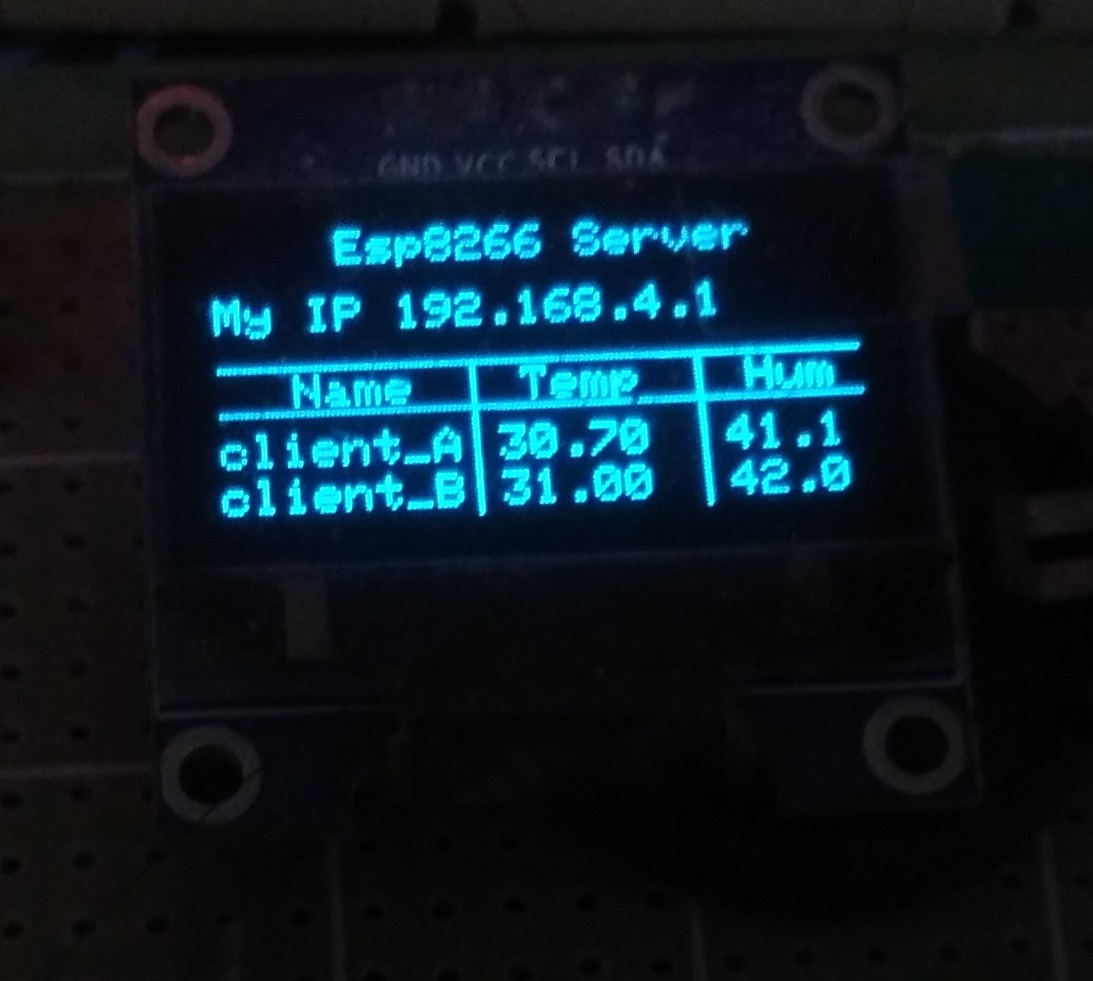
ทดสอบเขียนโปรแกรมโดยให้ Esp8266 client ไปจับ WiFi Esp8266 server เมื่อ Connect กันได้แล้ว ให้ Server Query web page ด้วยข้อมูลชนิด json และแยกข้อมูลออกเป็นส่วนๆ Name, temperature, humidity นำไปแสดงผล

การแสดงตำแหน่งตัวเลขผลกำหนดให้ Temp แสดงผล 000.00 Hum แสดงผล 00.00 เนื่องด้วยพื้นที่จำกัด
//======================================================//
เมื่อ Connect Esp client ได้หนึ่งตัวแล้ว ตัวสองก็ตามมา

ทดสอบเมื่อ Client ไม่สามารถ Connect ได้ให้แสดงผล Null ทดสอบทั้ง 2 ตัวสลับไปมา
*ลองใช้ Esp8266 V.01 V.12 เป็น Client ผลคือ V.01 มีปัญหา หาก V.12 ไม่มีการ Connect ตัวมันเองก็จะตัดการเชื่อมต่อเองไปด้วย ซึ่งเคยบอกหลายๆคนเสมอว่า V.01 ปัญญหาเยอะจัด แต่เอาไว้เทสได้

//======================================================//
Down load : https://drive.google.com/file/
Contact :https://www.facebook.com/dan.thummaratkmitl
ความคิดเห็นนี้ถูกผู้เขียนลบ
ตอบลบ